Disclosure of
Interests Online (DION) System
Online
Help
|
1. User
Registration |
To register a User ID in DION System for
submitting DI Forms/ reports |
|
2. Download DI
Forms |
(ii) to
download DI Form which is pre-filled with user profile information |
|
3. Form
Submission |
To login DION System and submit DI
Forms/reports (i) Individual user – submit Form 1, Form 3A, 3B, 3C
or 3D (ii) Corporate user – submit Form 2, Form 3A, 3B, 3C or
3D (iii) Listed Corporate user – submit Form 4
and/or special
report |
|
4. Change Login
password |
|
|
5. User Profile maintenance |
To maintain the following User ID
information (ii) merged User ID(s) |
|
6. Forgot User ID |
To retrieve User ID(s) registered under a specific
registered email address |
|
7. Forgot Password |
To unlock and reset user password if user has
forgotten the password |
|
8.
Listed corporation using ESS user account to login DION System |
ESS AP or ESS DI user can login DION
System to download DI Form(s) and attachment(s) filed through DION System (i) login |

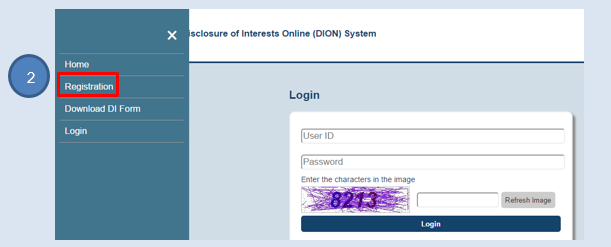
GO TO REGISTRATION PAGE
Click “![]() ”
on the top left corner (refer to number
bubble 1) and choose “Registration” from menu bar. (refer to number bubble 2)
”
on the top left corner (refer to number
bubble 1) and choose “Registration” from menu bar. (refer to number bubble 2)

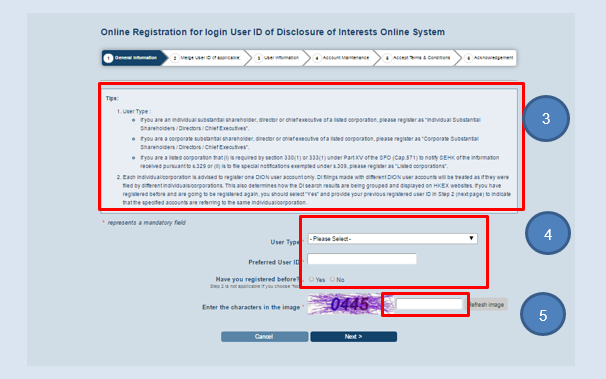
STEP 1 - GENERAL INFORMATION
Read the Tips (refer to
number bubble 3) and fill in general information (refer to number bubble 4). Input the characters in the image (refer to number bubble 5). After
completion, click “Next”.
Remark:
|
Data field |
Instruction / Data
to be inputted |
|
User Type |
Choose the relevant
user type |
|
Preferred User ID |
The "Preferred
User ID" must be alphanumeric (A-Z, a-z & 0-9) and be between 8 and
20 characters long. It should not
contain space or special characters. User ID is non-case-sensitive. Note:
Remember your inputted preferred User ID as it will not be shown in
subsequent confirmation page or activation email for security reason. |
|
Have you registered
before |
§ This check box will not be available if you are going to register as
listed corporation user. § Select “No” if you have not registered before (Step 2 will be skipped automatically
if you choose “No”.) § Select “Yes” if you have another active User ID. You will be brought
to Step 2 to merge previous registered User ID with the User ID you are now
registering. |
|
Enter the characters
in the image |
Enter the number as displayed
in the image. |
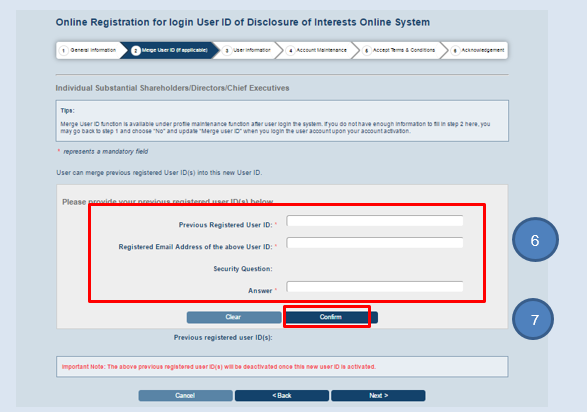
STEP 2 – MERGE USER ID(s) (IF APPLICABLE)
If you have chosen
“Yes” in Step 1, you will be brought to Step 2 to provide User ID of your
previous registered User ID (refer to number bubble 6). After completion, click “Confirm” (refer to number bubble
7).
Note:
1. As each individual or corporate user is
advised to register for one User ID only, if the user has registered a User
account before, the system will ask the user to provide the previous registered
User ID in this step for consolidating User IDs.
2. Previous User ID provided here will be
deactivated once the new User ID is activated through activation email.
3. After User IDs are being merged, the
system will consider the DI notices filed by the merged User IDs will be
regarded as being filed by same entity as the new user. This will determine how
the DI filings are consolidated under HKEX DI web search.
|
Data field |
Instruction / Data to
be inputted |
|
Previous registered
User ID |
Provide your
previous registered User ID Note: User ID not yet activated is not accepted |
|
Registered Email
Address of the above User ID |
Provide registered
email address for the previous registered User ID |
|
Security Question |
Upon completion of
the above 2 fields, security question will be prompted. Please provide answer
to it. |
|
Clear |
Click “Clear” if you
want to clear the content |
|
Confirm |
Click “Confirm”
after completion |
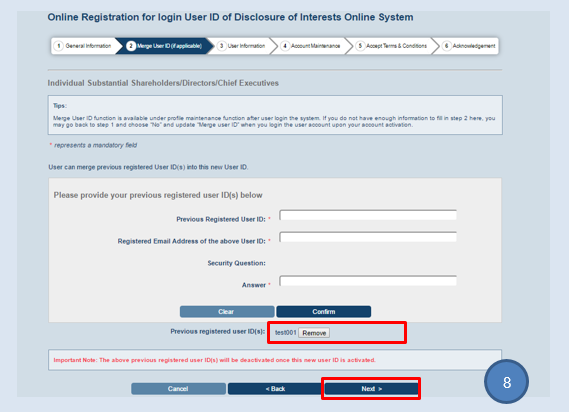
You will see the previous
registered User ID added to the list (refer to the highlighted box). Then click “Next” (refer to number
bubble 8).
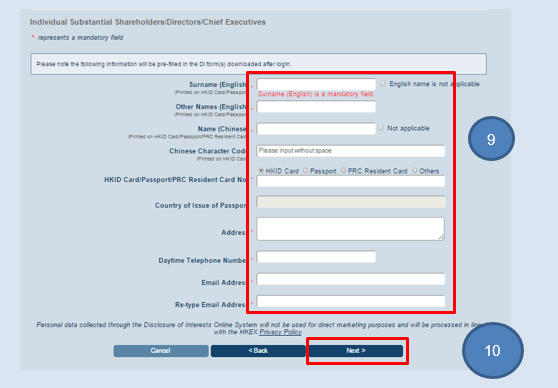
STEP 3 –
PROVIDE USER PROFILE INFORMATION
Fill in the user details (refer to number bubble
9; details for individual/ corporate users are presented in different screens). After completion, click “Next” (refer to number bubble 10).
Note: Profile information inputted here will be
pre-filled to the DI Forms if user downloads DI Form after logging into DION
System. In the future, user may log into DION System to update profile
information by using “User Profile Maintenance” function.
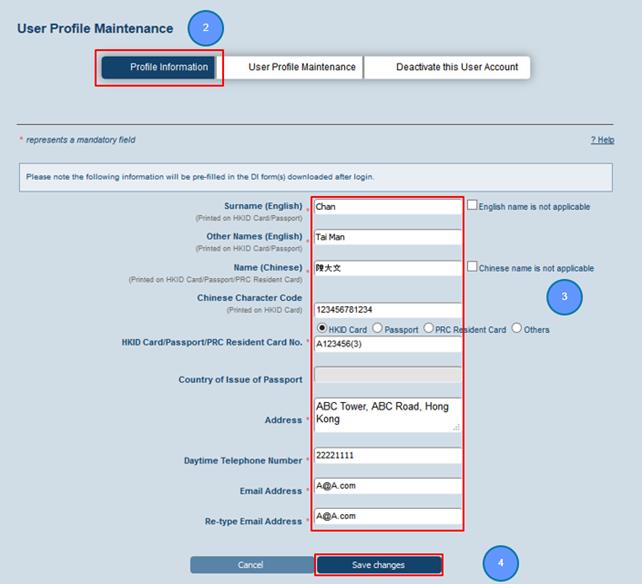
Remark/ example:
|
Data field |
|
Instruction / Data
to be inputted |
|
Name of Individual Substantial Shareholders/
Directors/Chief Executives |
Surname (English) |
Chan |
|
Other Names (English) |
Tai Man |
|
|
Name (Chinese) |
陳大文or check the box “Not Applicable” if not applicable |
|
|
Chinese Character Code |
123400005678 (If you check the box
“Not Applicable” above, you are not required to input Chinese Character Code) |
|
|
HKID / Passport / PRC Resident
Card |
If you are inputting
"HKID", please input in the format of A123456(7) If the filer chose “Others”, he/she
needs to provide details of his/her identification document. |
|
|
Country of Issue of Passport |
Applicable if you selected
“Passport” above |
|
|
Address |
ABC Tower, ABC Road, Hong Kong |
|
|
Daytime Telephone number |
22221111 |
|
|
Email Address |
||
|
Re-type Email Address |
||
|
Exchange on which it is Listed |
N/A |
|
|
Name of Listed Parent and Exchange
on which Parent is Listed |
N/A |
|
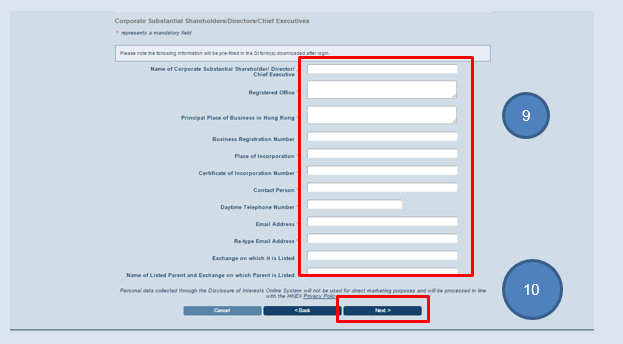
Remark/ example:
|
Data field |
Instruction / Data to be inputted |
|
Name of Corporate Substantial Shareholder/Corporate Director/Chief
Executive |
ABC Ltd. |
|
Registered Office |
ABC Tower, ABC Road, Hong Kong |
|
Principal Place of Business in Hong Kong |
ABC Tower, ABC Road, Hong Kong |
|
Place of Incorporation |
Hong Kong |
|
Certificate of Incorporation Number |
HK01 |
|
Contact Person |
Chan Tai Man |
|
Daytime Telephone Number |
22221111 |
|
Email Address |
|
|
Re-type Email Address |
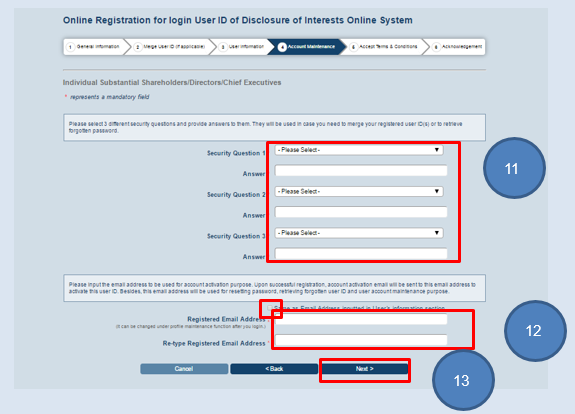
STEP 4 –
PROVIDE USER ACCOUNT MAINTENANCE INFORMATION
Select 3 different security questions and
provide answers (refer to number bubble 11). Input registered email address or
click the check box (refer to number bubble 12) if the registered email address is
the same as the email address inputted in “General Information” section. Click
“Next” to proceed (refer to number bubble 13).
Note:
Security
questions and answers will
be used when you need to reset your forgotten password or to merge User ID(s).
Registered
email address will be used
to activate User ID, retrieve forgotten User ID and merge User ID. The system accepts
using the same registered email address for different User IDs.
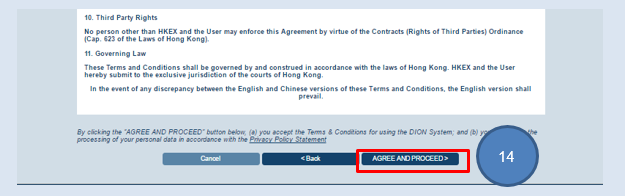
STEP 5 –
READ AND ACCEPT TERMS AND CONDITIONS
Read the terms and condition and privacy policy
statement. If you agree with the terms and conditions, click “Agree and
Proceed” (refer
to number bubble 14).
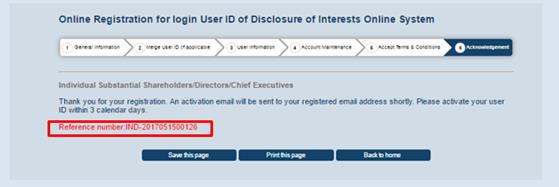
STEP 6 –
ACKNOWLEDGEMENT PAGE
You will find a system generated reference number (refer to the
highlighted box) on the acknowledgement page. You may save or print this
page for record.
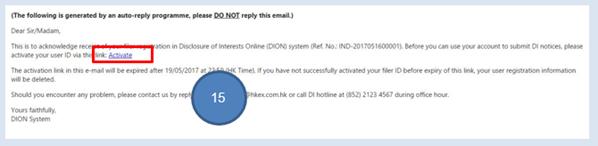
Note: You need to
activate your User ID before logging into DION System. Please check the mailbox
of registered email address, read the mail and activate (refer to
number bubble 15 to 17) the User ID within 3 calendar days through the link
provided.
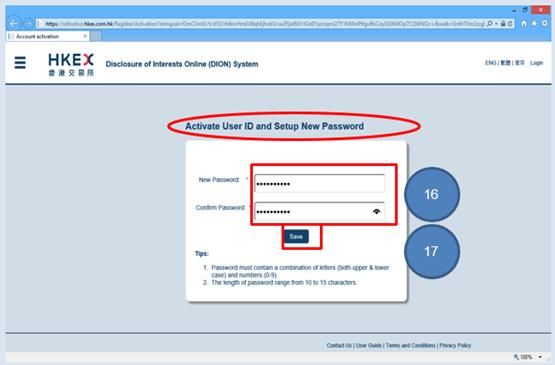
Note: Your new password must contain a
combination of letters (both upper & lower case) and numbers (0-9) and be
between 10 and 15 characters long.
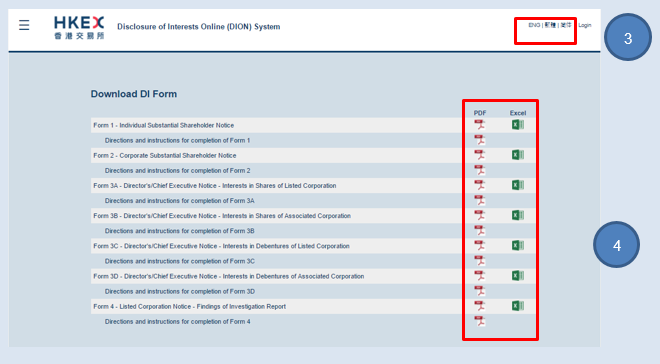
Download DI Form
DI Forms are available
in Adobe Portable Document format (“PDF”) or in Microsoft Excel format. If you are
a Windows user, you may download and file a notice using either format. If you
are a Mac, you may only download and file a notice in PDF.
(i)
Download blank DI Forms
Click “![]() ” on the top left corner (refer to number bubble 1) before
logging in.
” on the top left corner (refer to number bubble 1) before
logging in.

Click "Download DI Form" (refer to number bubble 2).

Note: You may download DI Form in a different language
(refer
to number bubble 4) by clicking
(ENG | 繁體 | 簡体) (refer to number bubble 3) on the top right corner.
(ii) Download Pre-filled DI Form
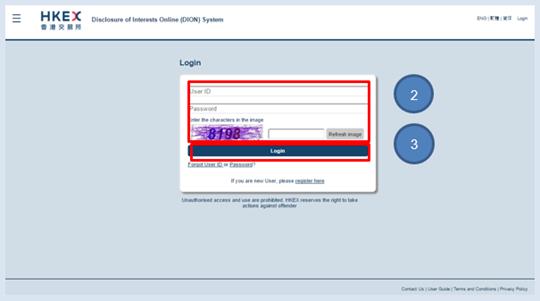
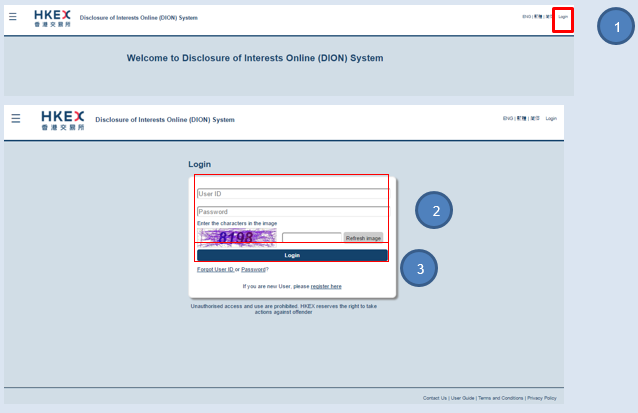
Log into DION System
Click “Login” on the top right corner
(refer to number bubble 1). Input
login details (refer to number bubble 2)
and click “Login” button (refer to number
bubble 3).

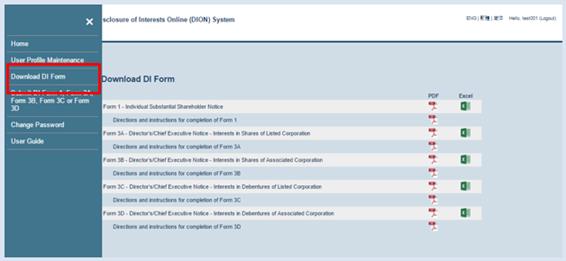
Download DI Form
Choose “Download
DI Form” from the top left menu bar (refer
to the highlighted box).
Note: Forms downloaded after logging into DION System will be
pre-filled with logged in user profile information. Also, only form type(s)
relevant to the logged in user will be available.
|
User
Type |
DI
Form type available for downloading after logging in |
|
Individual |
Form
1, Form 3A, 3B, 3C, 3D |
|
Corporate |
Form
2, Form 3A, 3B, 3C, 3D |
|
Listed
Corporation |
Form
4 |
Form Submission
To submit DI Form, user should log into DION System
with the User ID.
Remark:
|
User
Type |
Form
type available for submission |
Maximum
no. of DI Forms to be uploaded in each submission |
Other
documents to be uploaded (if applicable) |
|
Individual user |
Form
1, Form 3A, 3B, 3C, 3D |
10
DI Forms |
Concert
party document |
|
Corporate user |
Form
2, Form 3A, 3B, 3C, 3D |
10
DI Forms |
Concert
party document |
|
Listed Corporation user |
Form
4 |
1
DI Form |
Investigation
report + Concert party document |
|
Special
reports (by
listed corporations exempted under s.309 SFO) |
10
reports |
N/A |
(i)/ (ii) Submission of DI Forms by Individual/ Corporate
User
LOGIN AND GO TO SUBMISSION FUNCTION
Log into DION System by clicking
“Login” on the top right corner (refer to
number bubble 1). Input login details (refer
to number bubble 2) and click “Login” button (refer to number bubble 3).
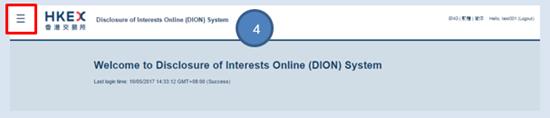
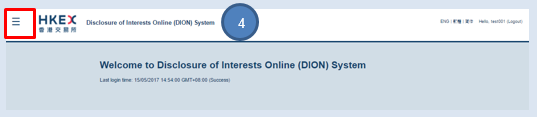
Click
"![]() "
to open the function menu on the top left hand corner (refer to number bubble 4).
"
to open the function menu on the top left hand corner (refer to number bubble 4).
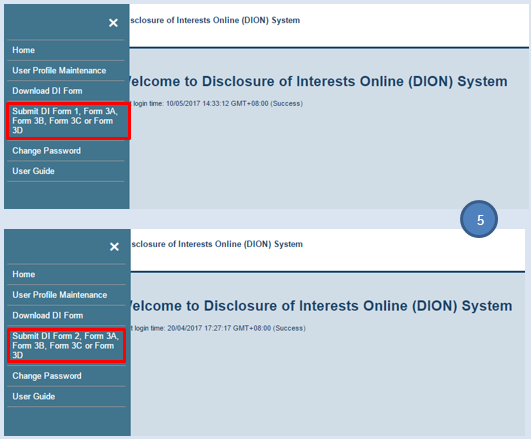
Click
(i) "Submit DI Form 1, Form 3A,
Form 3B, Form 3C or Form 3D". – For Individual user (refer to number bubble 5 – highlighted function).
(ii) "Submit DI Form 2, Form 3A,
Form 3B, Form 3C or Form 3D". – For Corporate user (refer to number bubble 5 – highlighted function)
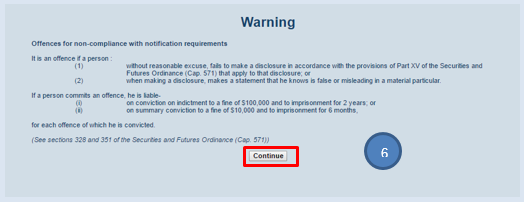
Read
the warning message and click "Continue" (refer to number bubble 6).
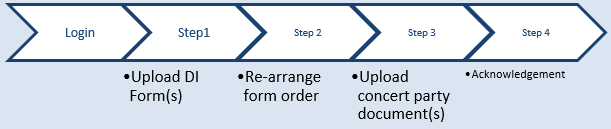
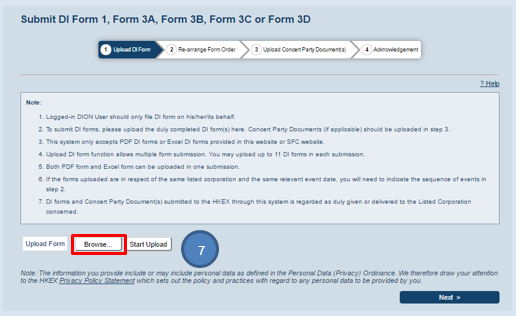
STEP 1 – UPLOAD DI FORMS
Click "Browse" (refer to number bubble 7) to select the
completed DI Forms from your computer folder.
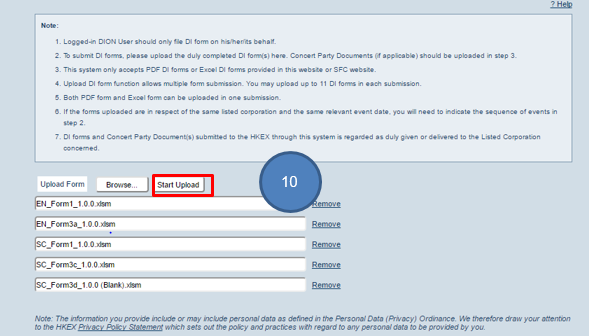
You may select up to 10 DI Forms (refer to number bubble 8) and click
“Open” (refer to number bubble 9).

Please click "Start Upload"
to upload the forms (refer to number
bubble 10).
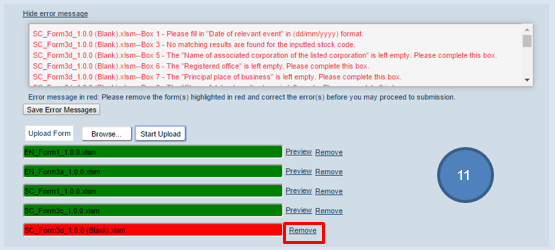
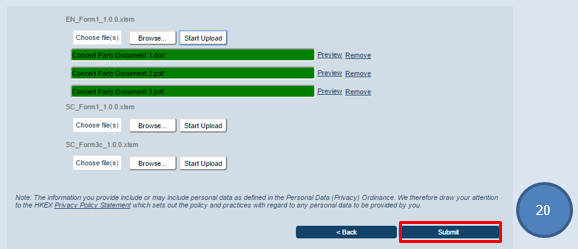
Note:
During the uploading process, the system will perform
online validation. Upload bar will turn green, yellow or red to indicate
whether the forms are ready for submission. If upload bar turns red, filer must
remove the form, make correction to the form and upload it again. Sometimes errors may be related to inconsistency between
logged in user profile and data input in the DI Form. User may need to update
either the DI Form or profile information within DION System before the form
can be submitted successfully.
|
Green upload bar |
DI Form has passed all
validation and is ready for submission |
|
Yellow
upload bar |
DI Form data and system
information do not match while DI Form can still be submitted if filer
considers amendment is not necessary. |
|
Red upload bar |
DI Form cannot pass
validation and filer is required to remove the form and make revision and
upload the file again. |
|
User
type |
DION
System profile details that are required to match the DI Form uploaded |
|
Individual
user |
1.
Name of substantial shareholder (English) 2.
HKID/Passport/PRC Resident Card No. 3.
Name of substantial shareholder (Chinese) 4.
email address |
|
Corporate
user |
1.
Name of substantial shareholder 2.
Place of incorporation 3.
Certificate of incorporation No 4.
email address |
|
Listed
corporation user |
1.
Stock code of listed corporation 2.
email address of individual filing this Form 4 |
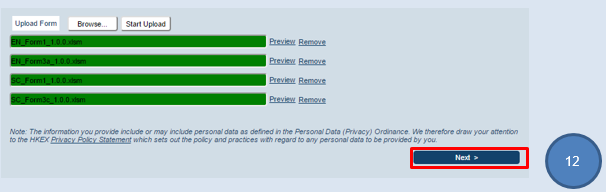
User may also preview the form using “Preview” button
against each form. When all DI Forms are ready for submission, click “Next” to
proceed (refer to number bubble 12).
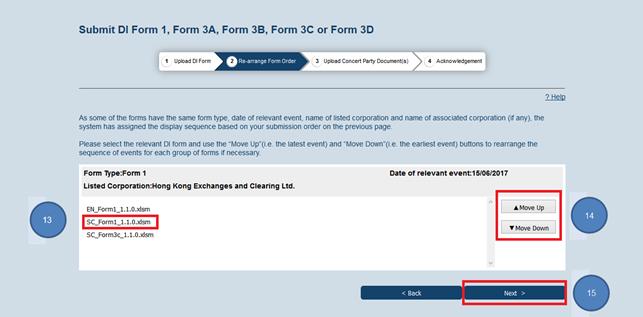
STEP 2 – RE-ARRANGE FORM ORDER
Note:
This step
will be skipped automatically if it is irrelevant to your submitted form(s).
If the system has detected two or more DI
Forms of the same type with the same “date of relevant event”, user may select
the form (refer to number bubble 13)
and re-arrange the order using the “Move Up” and “Move Down” buttons (refer to number bubble 14). By default,
the system will assign the display sequence based on the user's
submission order.
When the re-arrangement is completed,
the user can click "Next" (refer
to number bubble 15) to upload the Concert Party Documents.
STEP 3 – UPLOAD CONCERT PARTY DOCUMENT(S)
Note:
This step
will be skipped automatically if it is irrelevant to your submitted form(s)
(i.e. if you have uploaded Form 3B, 3C or 3D only)
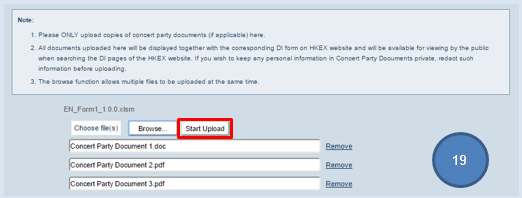
Click
"Browse" (refer to number bubble 16) below
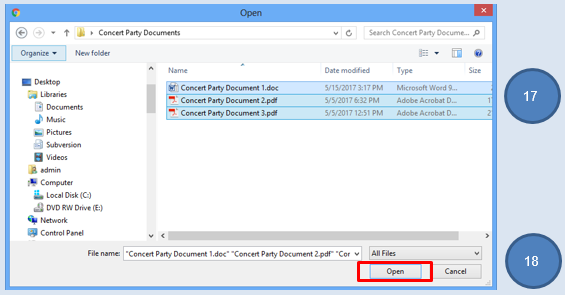
the DI Form file name which is required to upload concert party document(s).
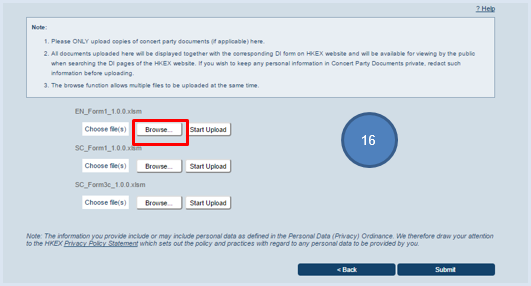
Select the concert party document(s) (refer to number bubble 17) to be submitted and then click “Open” (refer to number bubble 18).
Click "Start Upload" (refer to number bubble 19) to upload the Concert Party Documents.
When ready for submission, click
"Submit" to continue (refer to
number bubble 20).
Note:
There will be alert message(s) if the number
of concert party documents uploaded does not match the number as stated in the
DI Form. You may choose to continue your submission or to make appropriate
correction before submission.
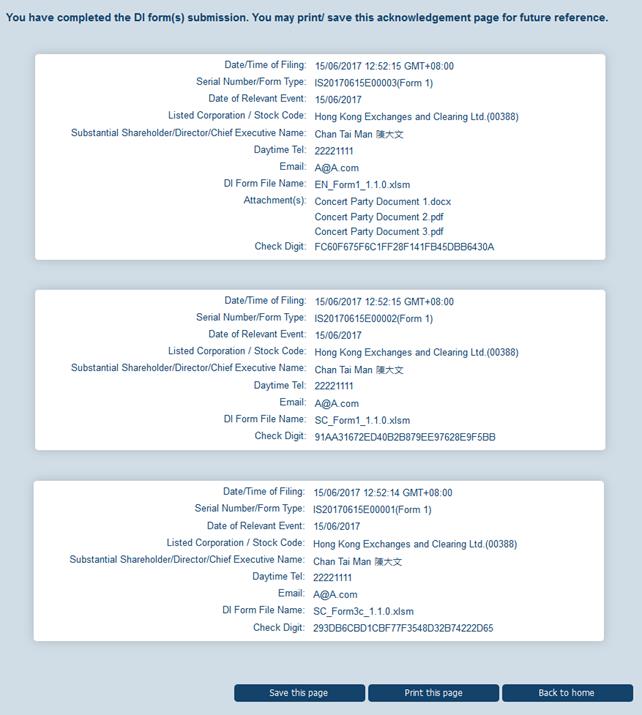
STEP 4 – ACKNOWLEDGEMENT
You will find a system generated serial
number on the acknowledgement page. You may save or print this page for record.
(iii) Submission of DI
Forms by Listed Corporation User
Submit Form 4
LOGIN AND GO TO SUBMISSION FUNCTION
Log into DION System by clicking
“Login” on the top right corner (refer to
number bubble 1). Input login details (refer
to number bubble 2) and click “Login” button (refer to number bubble 3).


Click
"![]() "
to open the function menu on the top left hand corner (refer to number bubble 4).
"
to open the function menu on the top left hand corner (refer to number bubble 4).
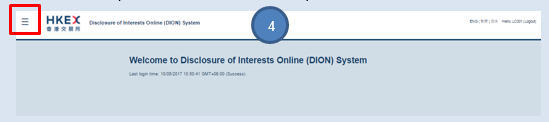
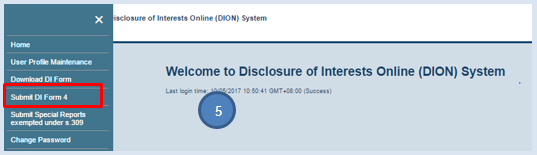
Click "Submit DI Form 4" (refer to number bubble 5).
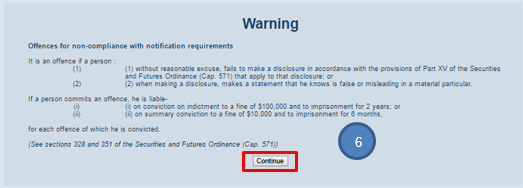
Read the warning message and click
"Continue" (refer to number
bubble 6).
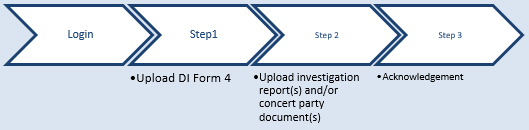
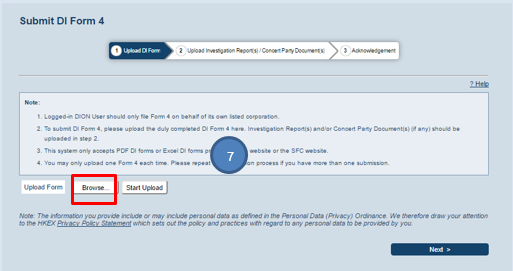
STEP 1 – UPLOAD DI FORM 4
Click "Browse" (refer to number bubble 7) to select
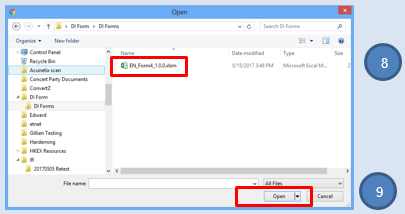
from file directory DI Form 4 to be submitted (refer to number bubble 8) and click “Open” (refer to number bubble 9).
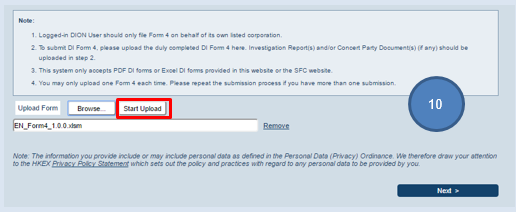
Click "Start
Upload" (refer to number bubble 10) to
upload the form and click “Next” after completion (refer to number bubble 11).

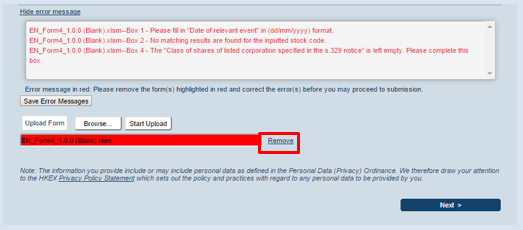
Note:
During the uploading process, the system will perform
online validation. Upload bar will turn green, yellow or red to indicate
whether the forms are ready for submission. If upload bar turns red, filer must
remove the form, make correction to the form and upload it again. Sometimes errors may be related to inconsistency between
logged in user profile and data input in the DI Form. User may need to update
either the DI Form or profile information within DION System before the form
can be submitted successfully.
|
Green upload bar |
DI Form has passed all
validation and is ready for submission |
|
Yellow
upload bar |
DI Form data and system information
do not match while DI Form can still be submitted if filer considers
amendment is not necessary. |
|
Red upload bar |
DI Form cannot pass
validation and filer is required to remove the form and make revision and
upload the file again. |
|
User
type |
DION
System profile details that are required to match the DI Form uploaded |
|
Individual
user |
1.
Name of substantial shareholder (English) 2.
HKID/Passport/PRC Resident Card No. 3.
Name of substantial shareholder (Chinese) 4.
email address |
|
Corporate
user |
1.
Name of substantial shareholder 2.
Place of incorporation 3.
Certificate of incorporation No 4.
email address |
|
Listed
corporation user |
1.
Stock code of listed corporation 2.
email address of individual filing this Form 4 |
Example of
red upload bar:
STEP 2 – UPLOAD INVESTIGATION REPORT(S) AND/OR CONCERT
PARTY DOCUMENT(S)
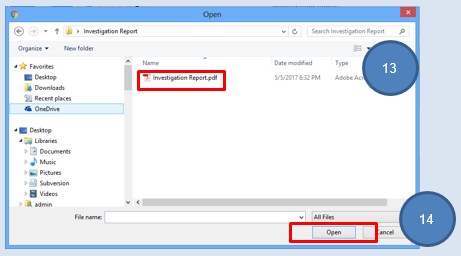
Click
"Browse" (refer to number bubble 12) to select Investigation Reports from the file
directory. Select file (refer to number bubble 13) and then click
“Open” (refer to number bubble 14).
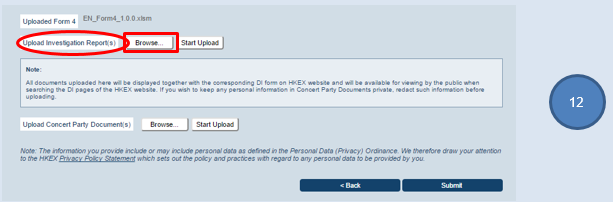
Click "Start Upload" (refer to highlighted box) to upload the investigation report.

Click
"Browse" (refer to number
bubble 15) to select Concert Party
Documents from file directory. Select file (refer to number bubble 16) and then click “Open” (refer to number bubble 17).
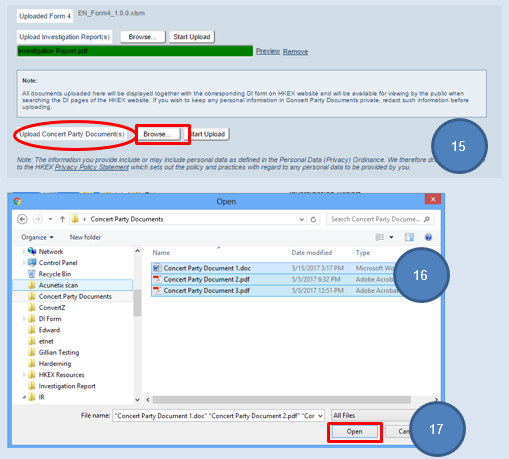
Note: You may upload
up to 10 concert party documents here.
Click "Start Upload" (refer to number bubble 18) to upload
the Concert Party Documents and click “Submit” (refer to number bubble 19) after completion.
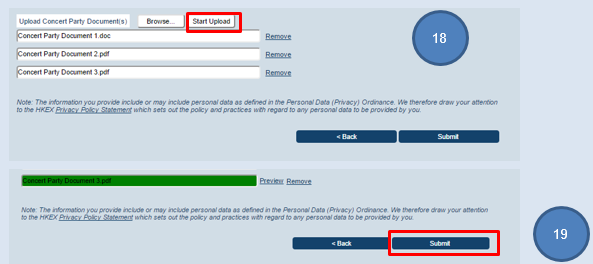
Note:
There will be alert message(s) if the number of concert party documents
uploaded does not match with the number as stated in the DI Form. You may
choose to continue your submission or to make appropriate correction before
submission.
The
investigation reports will not be published on the HKEX website. The
public cannot access the documents. The Concert Party Documents can be
viewed on HKEX website.
STEP 3 – ACKNOWLEDGEMENT
You will find a system generated serial
number on the acknowledgement page. You may save or print this page for record.

Submit Special Report (For
Listed Corporations Exempted under s.309 SFO)

LOGIN AND GO TO SUBMISSION FUNCTION
Log into DION System by clicking
“Login” on the top right corner (refer to
number bubble 1). Input login details (refer
to number bubble 2) and click “Login” button (refer to number bubble 3).

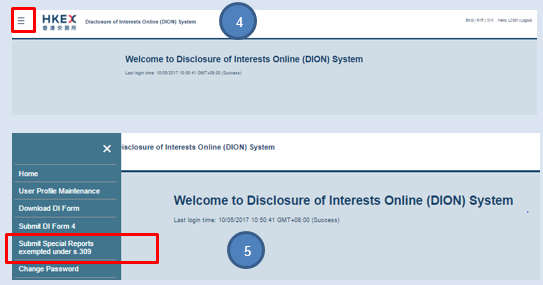
Click "![]() "(refer to number bubble 4) to open the
function menu on the top left hand corner and select “Submit Special Reports
exempted under s.309” (refer to number
bubble 5).
"(refer to number bubble 4) to open the
function menu on the top left hand corner and select “Submit Special Reports
exempted under s.309” (refer to number
bubble 5).
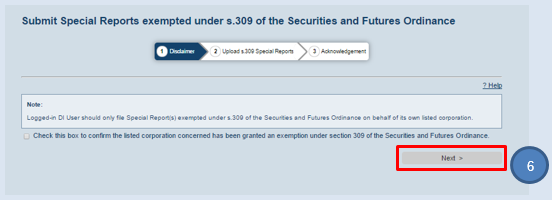
STEP 1 - DISCLAIMER
Click the check box to confirm the Listed Corporation
User has been granted an exemption and then click “Next” (refer to number bubble 6).
STEP 2 – UPLOAD s.309 SPECIAL REPORTS
Click
"Browse" (refer to number
bubble 7) to select from file directory the special report(s) (refer to number bubble 8) to be
submitted and click “Open” (refer to
number bubble 9). Click “Start Upload” to upload the report(s). After the
report(s) has/have been uploaded, please click "Submit" (refer to number bubble 10).
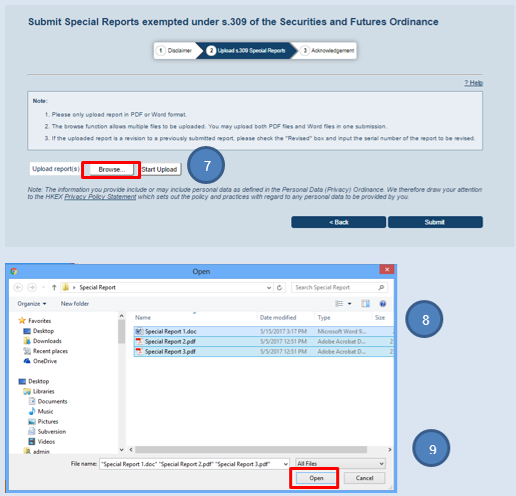

Note:
1.
Support
PDF and MS Word format.
2.
User
may upload up to 10 Special Reports in each submission.
3.
Maximum
size of each uploading file is 5MB.
4.
If the
uploaded report is a revision to a previous submitted report, please check the
"Revised" box against the report and input the serial number of the
report to be revised.
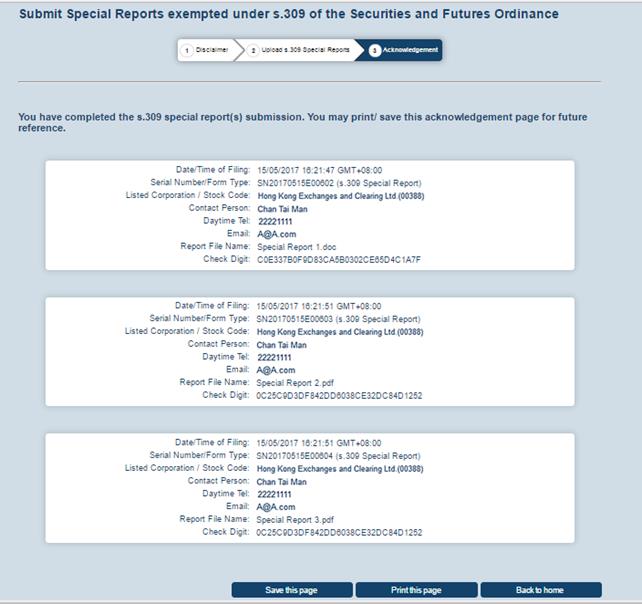
STEP 3 – ACKNOWLEDGEMENT
You will find a system generated serial
number on the acknowledgement page. You may save or print this page for record.
Log into DION System by clicking
“Login” on the top right corner (refer to
number bubble 1). Input login details (refer
to number bubble 2) and click “Login” button (refer to number bubble 3).
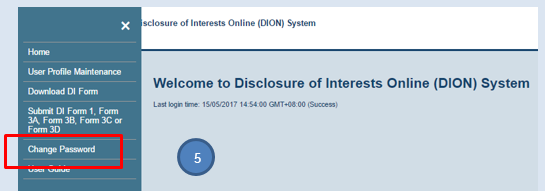
Click "![]() "
(refer to number bubble 4) to open
the function menu on the top left hand corner.
"
(refer to number bubble 4) to open
the function menu on the top left hand corner.
Click "Change Password” (refer to number bubble 5).
Input
current password, new password and confirm new password fields (refer to
number bubble 6).
Click “Submit” to confirm (refer to number bubble 7).

Note:
1.
Password
is case-sensitive.
2.
Password
should be a combination of letters (both upper & lower case) and numbers
(0-9), ranging from 10 to 15 characters.
3.
Upon
successful updating, the system will notify the user that "The password is
changed."
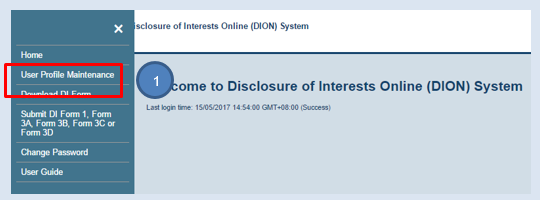
After
log into DION System, click "![]() "
(refer to number bubble 1) to open
the function menu on the top left corner and then click "User Profile
Maintenance” (refer to number bubble 2)
"
(refer to number bubble 1) to open
the function menu on the top left corner and then click "User Profile
Maintenance” (refer to number bubble 2)
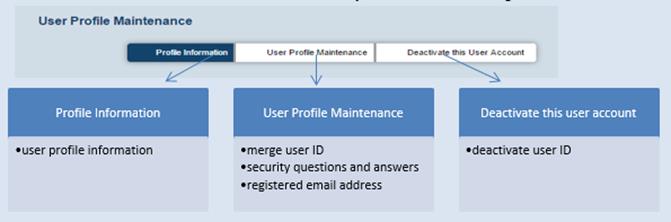
Under “User Profile Maintenance”
function, user may maintain the following User ID information under the
following 3 tabs.
Note:
1. To update the respective
information, user is required to select the tab right after entering the “User
Profile Maintenance” function.
2. Remember to save change/ confirm at
each tab before the information maintained with the system can be updated.
3. Facilities in the same tab cannot be
updated simultaneously. E.g. User cannot update registered email address and
merge User ID in a single process. User is required to update registered email
address and merge User ID in two updating processes.
(i)
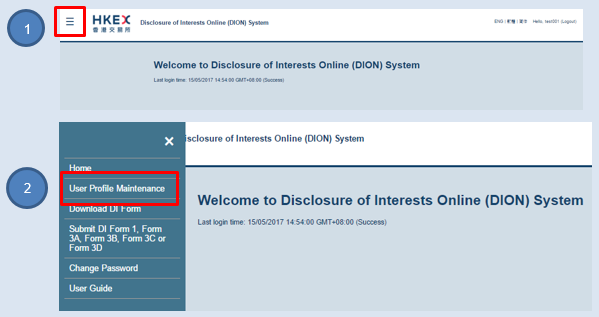
Update profile information
Under "User Profile Maintenance” function (refer to number bubble 1), click on the
1st tab “Profile Information” (refer
to number bubble 2). Then update the profile information (refer to number bubble 3). After
completion, click “Save Changes” button (refer
to number bubble 4) to confirm the updates.
Note:
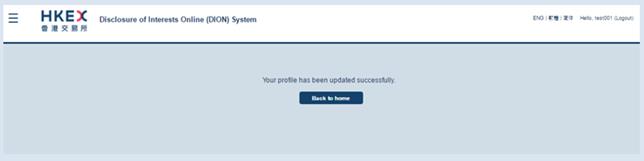
1. After user has successfully updated the profile information, the
corresponding updates will be reflected in the newly downloaded pre-filled DI
Forms.
2. Certain key profile information stated in the DI Form must match
the DION System record. You are advised to keep the profile information
up-to-date.
|
User
type |
DION
System profile details that are required to match the DI Form uploaded |
|
Individual
user |
1.
Name of substantial shareholder (English) 2.
HKID/Passport/PRC Resident Card No. 3.
Name of substantial shareholder (Chinese) 4.
email address |
|
Corporate
user |
1.
Name of substantial shareholder 2.
Place of incorporation 3.
Certificate of incorporation No 4.
email address |
|
Listed
corporation user |
1. Stock code of listed corporation 2. email address of individual filing this Form 4 |
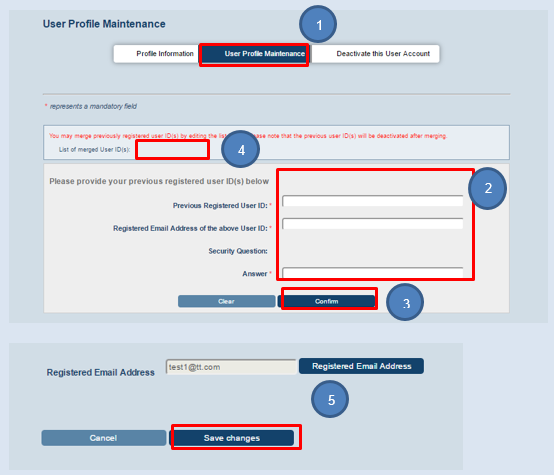
(ii)
Merge User ID (only available for individual and corporate user)
Under "User
Profile Maintenance” function, click on the 2nd tab “User Profile
Maintenance” (refer to number bubble 1).
Then input the previous registered User ID to be merged with current User ID (refer to number bubble 2). After
completion, click “Confirm” button (refer
to number bubble 3). The previous registered User ID will be updated in the
“List of merged User ID(s)” (refer to
number bubble 4). Upon completion, click “Save Changes” button (refer to number bubble 5) to confirm
the update.
Note:
1.
After you click “Save Changes”, the previous registered User ID will be
deactivated automatically.
2. Users
can merge one or more User ID(s).
3.
After User IDs are being merged, the DI notices filed by the merged User IDs
will be regarded as being filed by same entity as the current user. This will
determine how the DI filings are consolidated under HKEX DI web search.
|
Data field |
Instruction / Data
to be inputted |
|
Previous registered
User ID |
Provide your
previous registered User ID Note: User ID not yet activated is not accepted |
|
Registered email
address of the above User ID |
Provide registered
email address for the previous registered User ID |
|
Security Question |
Upon completion of
the above 2 fields, security question will be prompted. Please provide answer
to it. |
|
Close |
Click “Close” if you
want to cancel the update |
|
Confirm |
Click “Confirm”
after completion |
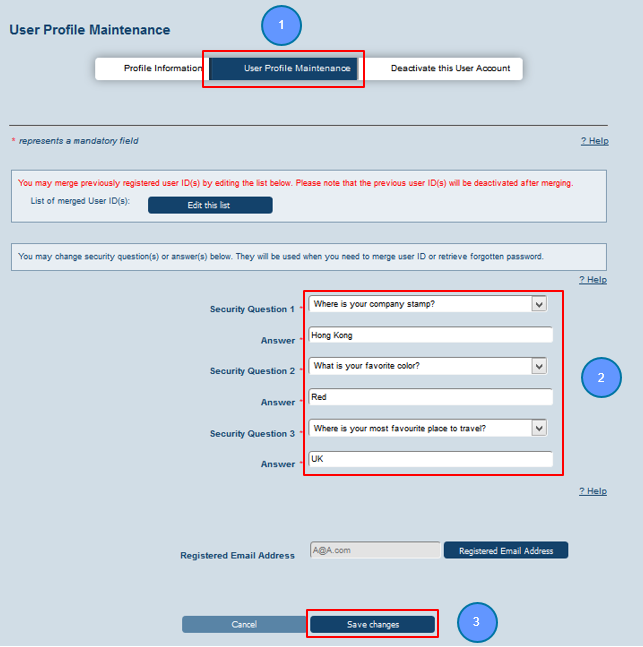
(iii) Security questions and answers maintenance
Under "User
Profile Maintenance” function, click on the 2nd tab “User Profile
Maintenance” (refer to number bubble 1).
Then modify/update the security questions and answers (refer to number bubble 2). Click “Save Changes” button (refer to number bubble 3) to confirm
the update.
Note:
Security
questions and answers will
be used when you need to reset your forgotten password or to merge User ID(s).
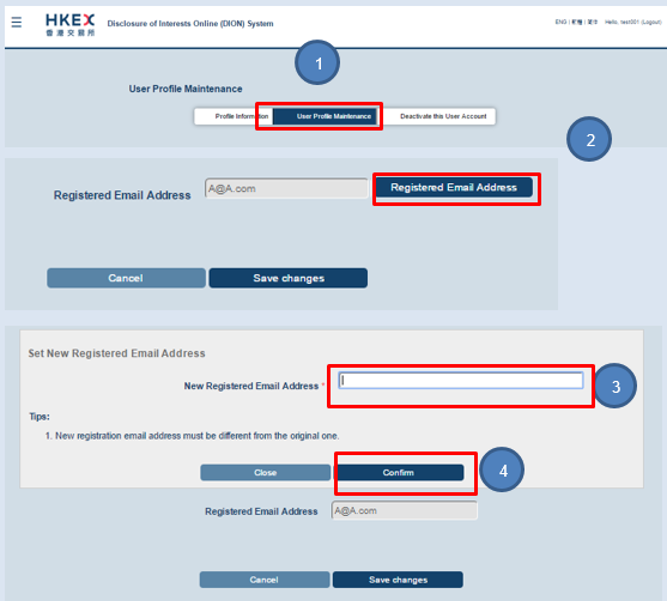
(iv) Registered email address
Under "User
Profile Maintenance” function, click on the 2nd tab “User Profile
Maintenance” (refer to number bubble 1).
Then click on the “Set Registered Email address” button (refer to number bubble 2). Enter the new registered email address (refer to number bubble 3) and click
“Confirm” (refer to number bubble 4).
Note:
1.
Registered email address will be used to activate User ID, retrieve forgotten
User ID and merge User ID. The system accepts using the same registered email
address for different User IDs.
2. The
system will not update the new registered email address until user has verified
the new registered email through an email sent to the new registered email
address.
3. The system will show the original
registered email address until the new registered email address becomes
effective.
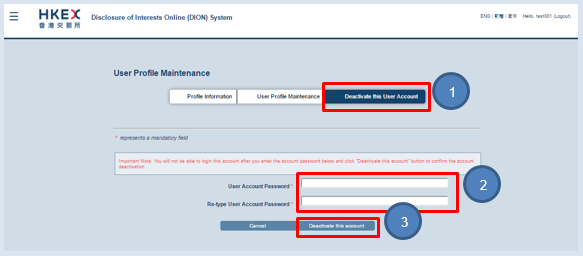
(v)
Deactivate User ID
Under "User Profile
Maintenance” function, click on the 3rd tab “Deactivate this User
Account” (refer to number bubble 1).
Input user account passwords (refer to
number bubble 2) and click “Deactivate this account” (refer to number bubble 3).
Note:
1. A
dialog box will be prompted to ask you to reconfirm if you are going to
deactivate this User ID. Choose “Yes” if you are going to deactivate this User
ID.
2. Once
user has confirmed the deactivation, user will be logged out immediately and
cannot log into DION System any more by using the deactivated User ID. There is
no way to restore the deactivated User ID.
3.
Deactivated User ID cannot merge with any other User ID.
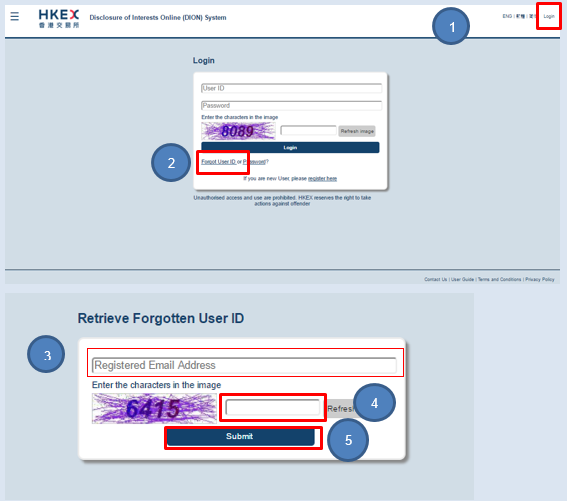
If User ID was forgotten, user can retrieve
the User ID by providing the registered email address used for that User ID.
The system will send all User ID(s) registered under that registered email
address.
1. Click “Login” on the top right corner (refer to number bubble 1) and then
click the link “Forgot User ID” (refer to
number bubble 2). Fill in the registered email address (refer to number bubble 3) of the forgotten User ID. Then, input
the characters in the image (refer to
number bubble 4) and click “Submit” (refer
to number bubble 5).
2. The system will send an email to the registered email
address. All User IDs registered under this registered email address will be
listed in the email.
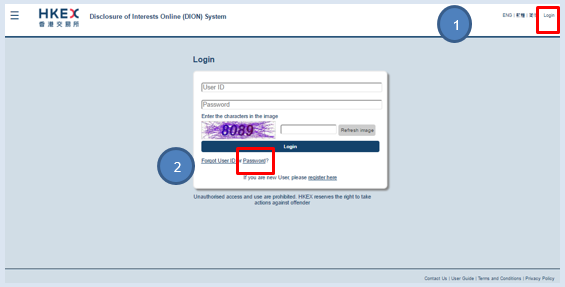
If you have forgotten your User password or
if your User ID has been locked after 5 consecutive unsuccessful login
attempts, user can reset and unlock User ID after providing User ID, registered
email address and answer to the security question. If correct information is
provided, the system will send an email to the registered email address with a
link to reset user password.
1. Click “Login” on the top right corner (refer to number bubble 1) and then
click the link “Password” (refer to
number bubble 2). Fill in the User ID and registered email address (refer to number bubble 3). Input the
characters in the image (refer to number
bubble 4) and click “Next” (refer to
number bubble 5). A security question will be posted. You need to provide
the answer (refer to number bubble 6) and
click “Submit” (refer to number bubble 7).
2. The system will send an email to the registered email
address. User may use the reset password link provided in the email to reset and
unlock the user account.
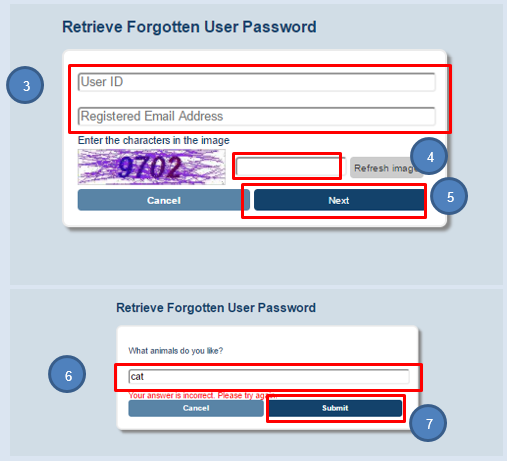
Listed corporation using
E-Submission System (ESS) user account to login DION System
(i) Login
The DION
System will notify the listed corporations by email upon receipt of DI notices
through DION System. The email notification will be sent to ESS users’ (AP with
DION System access rights/ ESS DI user) email address. Such user should log
into DION System by using his/her ESS User ID and password through the link https://sdinotice.hkex.com.hk/notification
to retrieve DI filing(s) and related document(s) filed for his/her listed
corporation.
Enter
URL https://sdinotice.hkex.com.hk/notification
(refer to number bubble 1). Click
“Login” on the top right corner (refer to
number bubble 2) and enter the ESS User ID and password (refer to number bubble 3). Then, input
the characters in the image (refer to
number bubble 4) and click “Login” (refer
to number bubble 5).
Note:
1. All ESS
users should maintain their account information through ESS website. (https://www1.esubmission.hkex.com.hk/)
2. To
ensure the notification email can be delivered in an accurate and timely manner
to the listed corporation, the AP/DI ESS user should always keep his/her
profile information up-to-date in ESS.
3. It is
possible to set more than one email address for each ESS AP/ DI user account.
Please input semi-colon between emails in format of a@Alistedcorp.com; b@Alistedcorp.com
(ii)
Download copy of DI Form(s) and attachment(s)
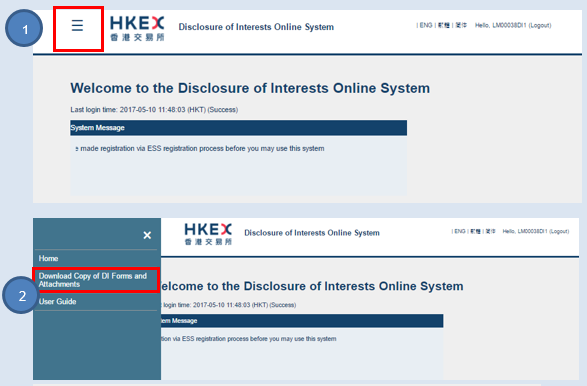
After
logged into DION System, click "![]() "
to open the function menu on the top left corner (refer to number bubble1). Select “Download Copy of DI Forms and
Attachments” (refer to number bubble 2).
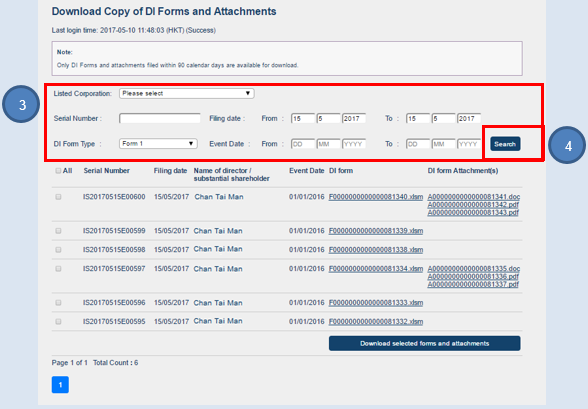
User will see DI Forms filed on current date. User may define search criteria (refer to number bubble 3) and click
“Search” (refer to number bubble 4) to
narrow down the display of DI Form(s) and attachment(s).
"
to open the function menu on the top left corner (refer to number bubble1). Select “Download Copy of DI Forms and
Attachments” (refer to number bubble 2).
User will see DI Forms filed on current date. User may define search criteria (refer to number bubble 3) and click
“Search” (refer to number bubble 4) to
narrow down the display of DI Form(s) and attachment(s).
Note:
1.
Only DI Forms and related documents filed within 90 calendar days are available
for downloading.
2.
User may use batch download function to download selected DI Forms and related
documents in zip file.
3.
By default, user will see all DI Form(s) filed on current date.
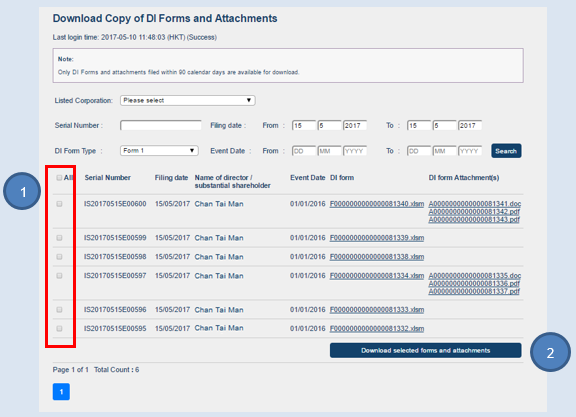
To
download DI Form(s) and attachment(s), please select the forms or click check
box of “All” to the left of serial number (refer
to number bubble 1) and then click “Download selected forms and
attachments” (refer to number bubble 2).
Note:
User
may also click on the link under “DI Form”/ “DI Form Attachment(s)” column to
download the specific DI Forms/attachments.
-END-